How to Package food for Long term Storage
How to Package Food for Long Term Storage
One thing that has been made clear this past year is that supermarkets and stores can't be relied on in times of crisis. Shelves can go bear in a matter of hours. We spend our lives under the assumption that there will always be a stable and consistent source of nutrients at arm's reach. However, things can go from zero to one hundred in the blink of an eye. It is no longer the hobby of the paranoid to keep food stocked in the event of a disaster. We may have once laughed at the man with 20 years' worth of canned food in his cellar, but these preppers now have more credibility. So, if you want to learn how you can package food for long term storage, continue reading.
The Bags to Use

This guide will go over packaging food for long term storage in metallic foil bags. Why this specific type? Well, foil bags have several benefits for long term storage. They are made of a light and impermeable material that is great at blocking out moisture and oxygen. The metallic foil creates a barrier that allows you to remove oxygen during the packaging process. Metallic film is also flexible, it can be bent and manipulated without ripping or puncturing. The foil we use in our packaging bags is also guaranteed to not degrade and transfer toxic chemicals into the stored food products. The food-safe lining finds in our foil pouches is BPA free and completely safe for food storage.
What Size to Use
A natural inclination is to find the largest bag and cram as much food into it as possible. However, this is a bad strategy. Why? Consider the old expression about eggs and baskets, or apples and bunches. If your giant bag of preserved beans is compromised, then the whole batch can be contaminated. The smallest hint of mold can mean the entire bag is infested with spores. Food also tends to spoil quicker when surrounded by larger quantities of food. Organic material will naturally release oxygen and moisture over time. The more food you have in one container, the higher the percentages of the two elements. Finally, consider ease of use. If you want to break into your food supplies, opening a giant vessel of food will then shrink the shelf life of the food stored. Yes, you can repackage the food or reseal it, but why waste resources redoing something? Multiple smaller bags is what you should be using. We recommend our 22 x 30 cm Stand Strong pouches. The best thing about these bags is they have a reliable zipper seal that will let you reseal the bags after you open them. The bags must be heat sealed to ensure the bags stored contents last for an extended period, but the zipper seal makes managing the food after opening easier.
What food to use

When deciding what foods to package, you'll want something with a long shelf life, something with a decent amount of calories, something easy to prepare, and something nutritious. Rice, beans, freeze-dried foods, nuts, and seeds are some examples of hardy foods that can last for a while. Canned foods like sardines or SPAM also have a decent shelf life but are lacking in the nutrition department. You will want to cover all your food groups too. For wheat and grains, rice, pasta, oats, and quinoa are good choices. You will want some beans for protein, black beans, pinto, kidney, chickpeas. A fat like olive oil, lard or coconut oil will be necessary. But oils can go rancid after a year or two, so check up on your oils annually. Then the tricky part: meat. You can go with canned fish, cured meat, or vegetable powder. Old meat is as palatable as shoe leather, so be careful with your meat storage.
How to do it

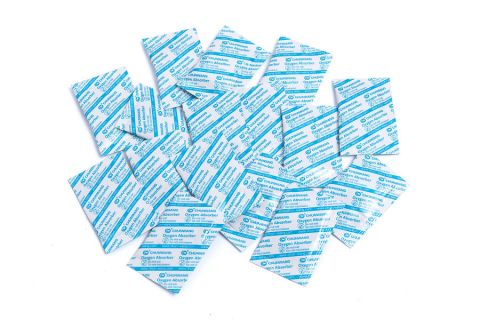
The process of sealing the bag is where you can make or break all your efforts. If the bag is sealed incorrectly, your supply can turn and you'll find yourself empty-handed. First, ensure that the bags being filled are clean and free of foreign matter. Add the food, and pinch the zipper seal partially shut. You are going to want to partially seal the bags before you add the oxygen absorbers. Seal the bag using an impulse heat sealer, leaving a slight opening to add the absorber. Oxygen absorbers come in a range of sizes from 50 to 2000 cc. For the 22 x 30 cm Stand Strong Bags, the 100 cc version should be fine. But, you can always add more. It's better to overcorrect than under correct for oxygen absorbers. You can also add bay leaves to your rice, grains, and beans. Bay leaves deter pests and rodents from chewing through the bags.
Where to Store

Now that you have your food packaged, the next step is to store it in a safe location. The clear option is a basement or cellar, as these locations are quiet, cool, and out of direct sunlight. The location you store your food should have these qualities, as well as being dry and away from pests. You should never store your packaged food directly on the ground, as flooding could destroy your supplies. The floor also increases the chance for pests like mice, ants, or roaches. For the best results, you should store your bags in a plastic drum or bucket with a lid. This will ensure that rats or any other vermin can't chew through the walls of the bag and eat your supplies. Our metallic film is tough, but rats have teeth strong enough to chew through concrete.
Last Notes
In a perfect world, you would not need to know how to store food for longer than a few weeks. We live in odd times, and the smart move is to be ready for the unexpected. There is no need to start stockpiling immediately. The best strategy is to prepare at least 3 days' worth of food for emergencies. Just something to feel safe. From there, you can add on more and more. When you have a years' worth of stockpiled food, that's a good place to stop. If you would like to learn more about prepping, view this blog on how to make your products disaster-proof. QQ Studio's packaging can be relied on to help you weather whatever storm may hit.


